
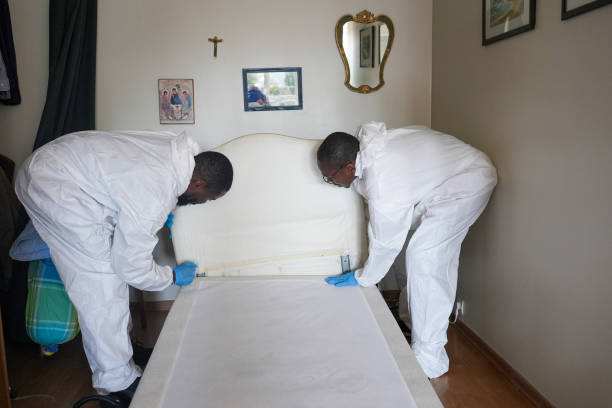
Think you’ve got bed bugs but can’t find where they’re hiding? You’re not the only one losing sleep over it.
These little vampires are experts at playing hide-and-seek, slipping into cracks, seams, and shadows you’d never think to check.
If you’ve woken up with itchy red bites or spotted tiny blood stains on your sheets, you’re already closer to a bed bug hiding spot than you realize.
The worst part is… If you miss just one cluster, the infestation comes back like it never left.
Spray the mattress but skip the nightstand? They’ll just move next door. Vacuum the carpet but ignore the baseboards? They’ll wait it out and strike again.
That’s how these pests survive and why so many people end up stuck in a never-ending battle.
And if you’ve got kids or pets, it hits harder. Bed bugs don’t care if your toddler’s napping or your dog’s curled up at the foot of the bed.
They’ll feed, breed, and crawl right back into the same cracks if you don’t eliminate every last one.
I’ve spent years tearing apart bedrooms, testing treatments, and digging through pest control research to figure out where these insects really live.
I’ve read the lab data, seen the field tests, and boiled it all down into plain language that actually helps.
I know that heart-sinking moment when you lift a couch cushion at 2 a.m., praying you’re not missing bed bug eggs hiding in the seams.
This guide is for homeowners, renters, or parents who’s done everything right but still wakes up scratching.
In the sections ahead, you’ll learn exactly how to find bed bug hiding spots, why they choose certain spots like mattress seams or electrical outlets, and how to check those areas without turning your home upside down.
You’ll understand the real signs of bed bugs and how to spot an early bed bug infestation before it spreads.
By the end, you’ll know every sneaky bed bug hiding spot worth checking and how to make sure they’ve got nowhere left to run.
We independently review every product we recommend. We test for safety, efficacy, and value, so you can buy with confidence. When you purchase through our links, we may earn a commission at no extra cost to you. Learn more about our testing methodology and affiliate disclosure.
First, Know Your Enemy: Understanding Bed Bug Behavior
Before you start tearing apart your bedroom, you need to understand what drives these insects.
I learned this the hard way in 2020 when I spent three hours inspecting my apartment after finding bites, only to realize I’d been looking in all the wrong places.
Bed bugs aren’t random, they follow predictable patterns based on biology.
Knowing why they hide where they do cuts your inspection time in half and stops you from missing the spots that matter most. This section gives you the behavioral blueprint that professionals use.
Why They Hide: The Thigmotropic Nature of Bed Bugs
Bed bugs exhibit thigmotaxis. A fancy term that means they’re hardwired to seek tight spaces where their bodies touch surfaces on multiple sides.
It is like the insect version of being tucked under a weighted blanket. They feel safest when squeezed into cracks, seams, and crevices.
This isn’t just preference, it’s survival instinct. According to research, bed bugs in tight harborages are less likely to be discovered and removed during cleaning compared to those in open areas.
They’ve evolved over thousands of years to hide in the exact spots humans rarely inspect: the seam where your mattress folds, the gap behind your baseboards, the void inside a screw hole.
What this means is if a credit card can fit into a space, a bed bug can live there.
Adult bed bugs are only 4-5mm long (about the size of an apple seed), while nymphs and eggs are even smaller.
That’s why you need to check every crack, fold, and junction in the rooms where people sleep or rest for extended periods.
Common mistake #1: People only check flat, visible surfaces. They lift the mattress, glance underneath, see nothing, and assume they’re clear.
But bed bugs avoid open spaces. You need to physically separate seams, peel back fabric edges, and probe crevices with a flat tool.
Common mistake #2: Assuming they only live in “dirty” homes. Bed bugs don’t care about cleanliness, they care about blood access and hiding spots.
I’ve seen infestations in five-star hotels and immaculate suburban homes. Clutter gives them more hiding spots, but even minimalist bedrooms with tight construction can harbor them.
How Close Do They Stay to Their Food Source?
Bed bugs are lazy travelers. Research published by the University of Kentucky Department of Entomology shows that bed bugs stay close to where people sleep.
They don’t roam your entire house looking for victims, they set up camp near the buffet.
This creates your priority inspection zone. Start with the bed and radiate outward in concentric circles.
Check the mattress first, then the bed frame, then nightstands, then the walls within 8 feet of the bed.
If you’re short on time or energy, this radius is where you’ll find 90% of the evidence.
The only exception is advanced infestations.
When bed bug populations explode (usually after 6+ months of unchecked breeding), they spread to secondary areas such as adjacent rooms, living room furniture, even closets.
But early-stage infestations almost always stay bedroom-focused.
Pro tip: If you sleep on a couch regularly — say, for afternoon naps or late-night TV — treat that couch like a second bed. Inspect it with the same rigor. Bed bugs will establish satellite colonies wherever you spend 4+ hours stationary.
What You’re Actually Looking For: Beyond the Live Bed Bugs
Most people think a bed bug inspection means hunting for crawling insects.
But live bed bugs are the least common sign you’ll find, especially in early infestations.
According to the EPA’s bed bug identification guide, you’re far more likely to spot the evidence they leave behind.
Here are the 5 key signs, listed from most common to least:
1. Fecal Spots (Dark Stains)
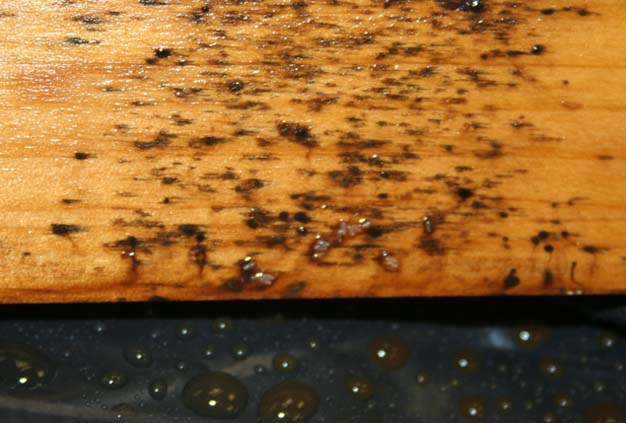
These look like tiny black or dark brown ink dots on fabric, about the size of a pen tip.
They’re digested blood that bed bugs excrete after feeding. On mattresses and sheets, they often appear in clusters near seams.
On wood or walls, they look like small, raised dots (because the feces dry and become slightly textured).
When I inspected my sister’s guest bedroom in 2022, we found zero live bed bugs but dozens of fecal spots along the mattress piping.
A confirmation of an active infestation even without seeing the insects themselves.
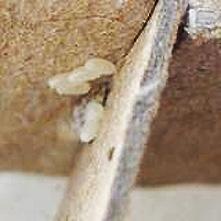
2. Shed Skins (Exoskeletons)
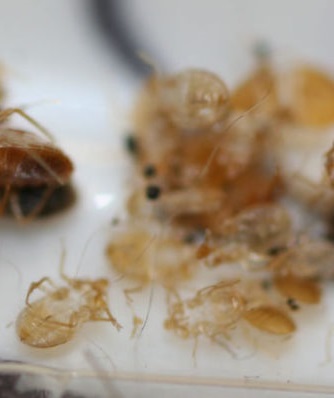
Bed bugs molt 5 times before reaching adulthood, leaving behind pale, translucent shells that look like empty bug casings.
They’re paper-thin, light brown or amber, and often found in the same tight spaces where bed bugs hide.
If you see shed skins, you know nymphs (young bed bugs) are developing nearby.
3. Bed Bug Eggs
Bed bug eggs are about 1mm long — roughly the size of a grain of salt — and pearly white.
They’re sticky, so females cement them into cracks and seams where they won’t be dislodged.
You’ll need a flashlight and magnifying glass to spot them.
Each female can lay 200-500 eggs in her lifetime, which is why missing even a few can restart an infestation.
4. Blood Stains
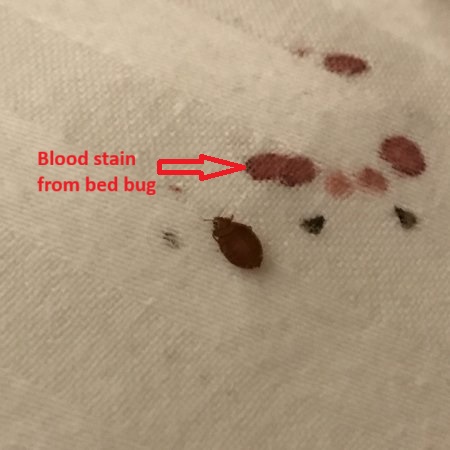
Small reddish or rust-colored smears on sheets, pillowcases, or pajamas.
These appear when you roll over and crush a bed bug that just fed on you (their bodies are engorged and fragile right after feeding).
Not everyone gets these stains, but if you do, it’s a strong indicator.
5. Live Bed Bugs
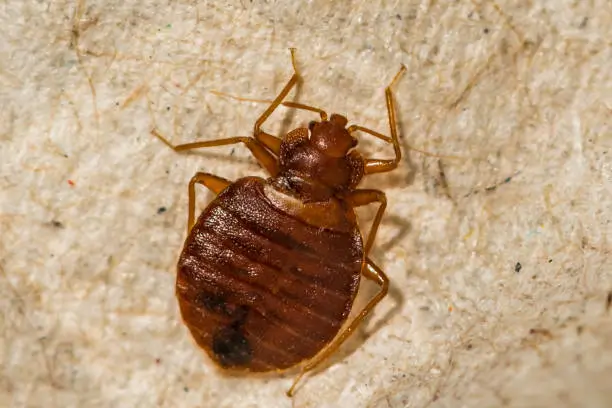
Adult bed bugs are reddish-brown, flat, and oval — about the size and shape of an apple seed.
Nymphs are smaller and translucent (almost see-through) until they feed.
Live bed bugs are most visible at night (they’re nocturnal), but infestations rarely get so bad that you see them crawling in daylight unless you’re dealing with severe overcrowding.
Understanding bed bug behavior is your roadmap. You now know they hide in tight cracks within 8 feet of where you sleep, and you’re looking for fecal spots and shed skins as much as live bugs.
That knowledge alone puts you ahead of 80% of people who waste time checking random spots with no strategy.
Next, we’ll cover the exact tools you need to conduct a professional-grade inspection without spending a fortune on equipment.
Your Bed Bug Inspection Toolkit: What You’ll Need
When I did my first bed bug inspection, I used my phone’s flashlight and my bare hands.
I missed half the hiding spots, couldn’t see the tiny eggs, and ended up having to re-inspect everything three days later with proper tools.
That second inspection took 30 minutes instead of two hours because I had the right equipment.
You don’t need to spend a fortune, but you do need specific tools that let you see into dark crevices, separate seams, and collect evidence without contaminating your hands.
This section covers exactly what to buy (and what you already own) to conduct a thorough, professional-grade inspection.
The Non-Negotiables
These five tools are the baseline for any effective inspection. The total cost should be about $25—$40 if you’re buying everything new, but you likely already own a few.
1. A High-Powered Flashlight

Your phone’s flashlight isn’t enough. Bed bugs hide in shadows, and you need a focused beam that illuminates deep into cracks without creating glare.
Look for a flashlight with at least 200 lumens and an adjustable beam.
I use a basic LED tactical flashlight from Amazon (about $15) that’s bright enough to spot fecal stains on dark fabric and small enough to angle into tight spaces.
Why it matters: According to a study by Rutgers University’s Center for Vector Biology, inspectors using dedicated flashlights detected bed bug evidence more often than those using ambient room lighting or phone lights.
The difference isn’t small, it’s the gap between finding an infestation early and letting it spread for months.
2. A Rigid Card or Putty Knife

You need something flat and firm to physically separate mattress seams, scrape along baseboards, and probe into crevices.
An old credit card works perfectly (I keep an expired one specifically for this). A plastic putty knife from a hardware store ($7) is even better because it has a wider edge.
How you’ll use it: Slide the card along mattress piping to reveal hidden bugs or eggs.
Run it between the baseboard and carpet edge to expose bed bugs hiding in the gap. Press it into furniture joints to see if anything flees or falls out.
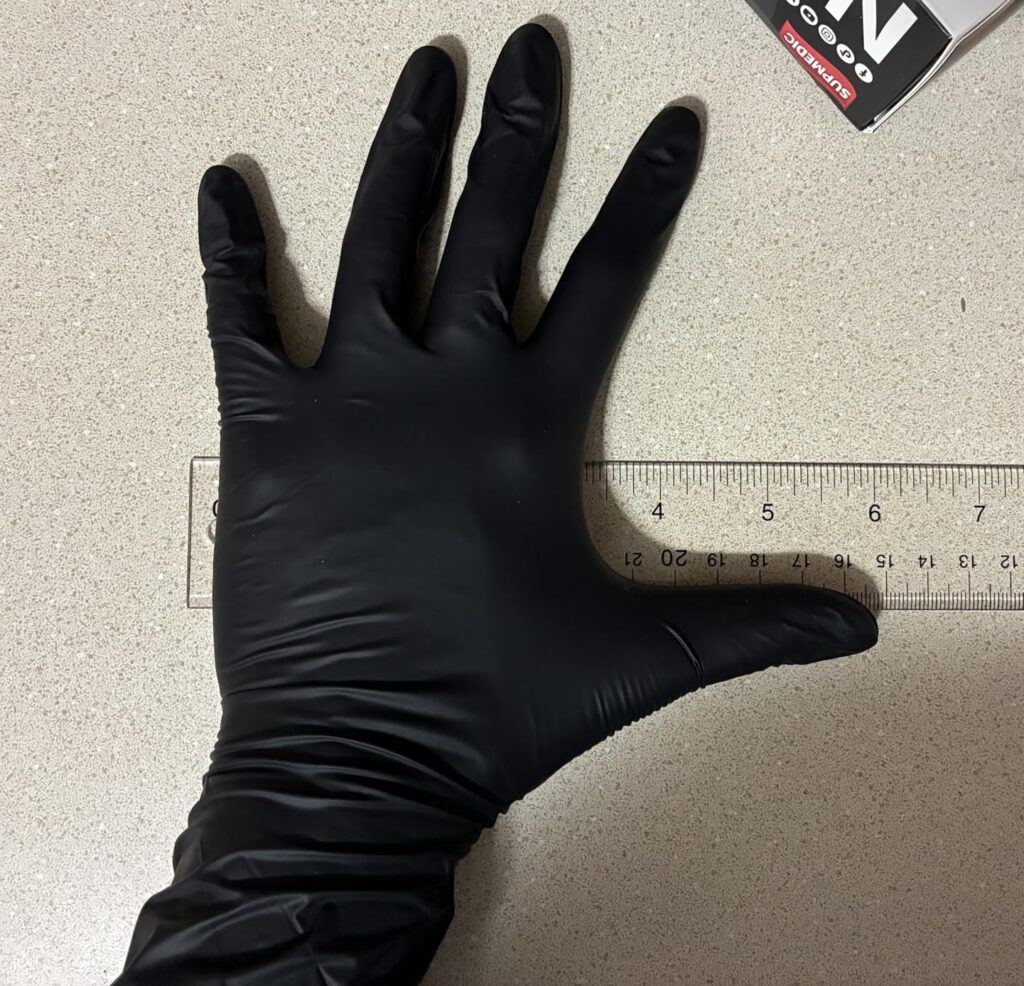
3. Disposable Gloves
This is about hygiene and safety. Bed bug fecal matter, shed skins, and crushed bed bugs aren’t dangerous, but you don’t want them on your hands, especially if you’re touching your face or handling food later.
A box of nitrile gloves costs $8-$12 and lasts for months.
Also, using gloves protect you from any residual pesticides if someone treated the area before you moved in (common in rentals).
4. A Magnifying Glass

Bed bug eggs are 1mm long. Nymphs in their first stage are translucent and barely visible.
A simple magnifying glass (the kind you can get at a dollar store for $2-5) turns these invisible threats into identifiable evidence. You don’t need anything fancy — 3x to 5x magnification is plenty.
Pro tip: Use the magnifying glass on suspected fecal spots. Fresh bed bug feces will have a slightly raised texture and may smear if you touch it (it’s still moist). Old feces are dry and look like pepper flakes. Knowing the difference helps you estimate how recent the activity is.
5. Zip-Top Bags and Clear Tape

If you find suspected bed bugs, eggs, or shed skins, you need to collect samples for confirmation (or to show a landlord or pest control professional). Place specimens in a zip-top bag or stick them to clear tape, then seal and label with the date and location.
Why this matters: Misidentification is common. According to the University of Kentucky Department of Entomology, bed bugs are sometimes mistaken for ticks, cockroaches, carpet beetles, or other household insects.
Having physical evidence lets you confirm before spending money on treatment.
Pro-Tip: Using a Hair Dryer (Cool Setting)

This is an optional but surprisingly effective trick I learned from a pest control exterminator in Chicago.
Set a hair dryer to the cool setting (never hot, you don’t want to kill anything yet, just expose it).
Blow air into cracks, behind baseboards, or along mattress seams.
The air current mimics the CO₂ and warmth of a sleeping human, which can coax bed bugs out of deep hiding spots.
When to use it: If you’ve found evidence (fecal spots, shed skins) but can’t locate live bed bugs, the cool air technique helps confirm they’re still present.
Run the dryer for 15-30 seconds in suspected areas and watch for movement.
When NOT to use it: If you’re dealing with a confirmed heavy infestation, don’t use this method — it can scatter bugs to new areas.
And never use the hot setting during inspection; heat treatment is a job for professionals with industrial equipment that reaches 118°F+ throughout entire rooms.
Common mistake #1: Buying expensive thermal cameras or CO₂ traps for initial inspection.
These tools are useful for professionals tracking large infestations, but they’re overkill (and often ineffective) for homeowners doing a first check.
A $400 thermal camera won’t help you see a bed bug hiding in a mattress seam better than a $15 flashlight and magnifying glass.
Common mistake #2: Skipping gloves because “it’s just bed bugs.” I’ve inspected rental units where previous tenants left hazardous DIY treatments. Gloves protect you from unknowns, not just bed bugs.
With these tools — flashlight, card, gloves, magnifying glass, and collection bags — you’re equipped to inspect like a professional without the professional price tag.
The total investment is under $40, and every item is reusable for future checks or prevention.
Now that you know what to use, it’s time to put those tools to work. We’re heading to ground zero, that is your bedroom, where 95% of bed bug infestations start and concentrate.
Ground Zero: The Master Bedroom Inspection
Your bedroom is where this battle will be won or lost. In 2020, I helped my neighbor inspect her apartment after she’d been treating for bed bugs for three months with no success.
We found the reason in 10 minutes. She’d never checked inside the hollow metal bed frame tubes.
There were dozens of bed bugs living in the frame’s interior, untouched by every bed bug spray and powder she’d used.
This section breaks down the bedroom inspection into a systematic process that ensures you don’t miss anything.
We’ll start with the bed itself (the epicenter of most infestations), then move outward to furniture and the room’s perimeter.
Follow this sequence exactly, and you’ll cover 95% of the hiding spots that matter.
The Bed & Frame: A 10-Step Dissection
The bed is ground zero. According to research, the highest concentration of bed bug activity is found very close to a person’s sleeping area.
That means your mattress, box spring, and frame deserve the most attention.
Step 1: Strip the bed completely (5 minutes)

Remove bed sheets, pillowcases, mattress pad, and duvet. Place everything directly into a trash bag — don’t carry armfuls through your house.
Seal the bag and set it aside for laundering. This prevents accidentally spreading bugs or eggs to other rooms.
Step 2: Inspect all bedding seams and folds (3 minutes)
Before washing, examine the seams of your sheets and pillowcases with your flashlight. Look for tiny black fecal spots or bloodstains.
Check pillow seams and any decorative folds in your duvet cover. I once found a cluster of bed bug eggs cemented into the piping of a decorative pillow — a spot most people never check.
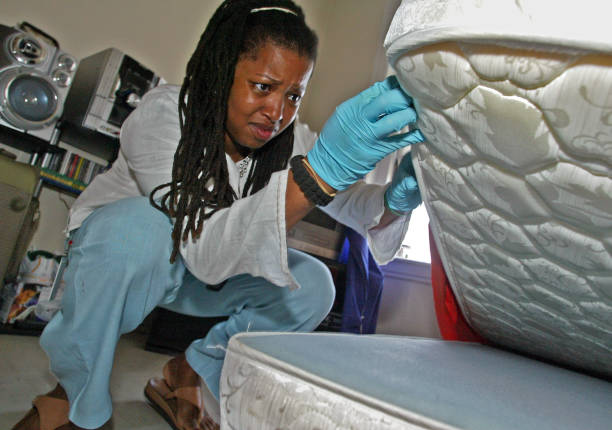
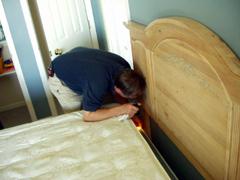
Step 3: Examine the entire mattress, starting with seams (10 minutes)

This is the most critical step. Use your flashlight and credit card to inspect
- Top and side seams (where the fabric panels join): Run your card along every seam to separate the fabric slightly. Bed bugs wedge themselves into these folds.
- Buttons and tufts: If your mattress has decorative buttons or quilted sections, check around and underneath each one.
- Tags and labels: Peel back the fabric around care labels. Bed bugs hide in the small pocket where tags attach.
- Air vents (on some mattresses): Small mesh holes for breathability are perfect entry points.
Pro tip: Work in a grid pattern — top left to top right, then middle, then bottom. This prevents you from losing track of what you’ve checked.
Step 4: Flip and inspect the underside (5 minutes)

The mattress underside is often neglected but equally important. Check the entire bottom surface, focusing on corners and the center where the fabric might be looser.
Step 5: Inspect the box spring thoroughly (15 minutes)
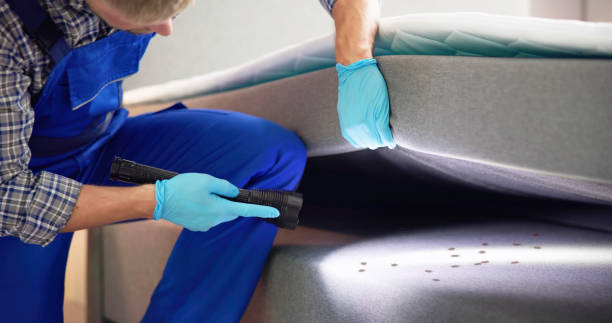
Box springs are bed bug havens. The thin fabric covering (called a dust cover) and the hollow interior provide countless hiding spots. Make sure you check these hiding spots:
- Top surface seams and corners
- All four sides, especially where staples attach the fabric
- The bottom dust cover: This is crucial. Most box springs have a thin black fabric stapled to the bottom. Carefully peel back one corner (you can re-staple it later) and inspect inside the hollow frame with your flashlight. In moderate to heavy infestations, you’ll often find bed bugs, eggs, and fecal staining inside this cavity.
I helped a friend inspect his box spring in 2021 and found over 50 bed bugs living inside the hollow wooden frame — completely invisible from the outside.
He’d been sleeping on that bed for months wondering why treatments weren’t working.
Step 6: Check every part of the bed frame (10 minutes)
Inspect headboard, footboard, and side rails. Pay attention to:
- Screw holes and bolt joints: These recesses are prime harborages.
- Cracks in wooden frames: Even hairline cracks can hide nymphs and eggs.
- Decorative carvings or grooves: Any texture creates hiding spots.
Step 7: If it’s a metal frame, inspect inside hollow tubes (5 minutes)
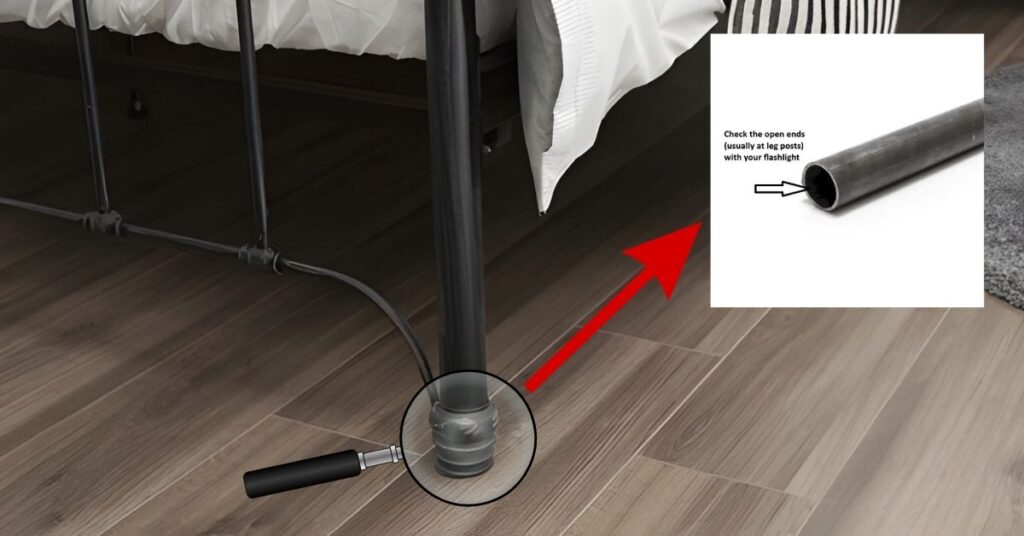
Many metal frames are hollow. Check the open ends (usually at leg posts) with your flashlight.
If you see fecal staining or bed bugs inside, you may need to disassemble the frame for treatment.
Step 8: Look behind headboard attachments (3 minutes)
If your headboard has attached reading lights, USB ports, or decorative elements, check behind and around them. These create gaps perfect for hiding.
Step 9: Check bed skirts and dust ruffles (2 minutes)

Inspect the hem, pleats, and where the skirt attaches to the bed. Shake it out over a white sheet to see if anything falls.
Step 10: Inspect items stored under the bed (5 minutes)

Storage boxes, shoes, luggage — anything under your bed should be checked.
Bed bugs will colonize stored items if the infestation is established. Pull everything out and inspect individually.
Total time for bed inspection: Approximately 60-65 minutes
Common mistake #1: Rushing through mattress seams. People run their hand along a seam for 3 seconds, see nothing, and move on.
You need to physically separate the fabric with your card and use bright light at multiple angles. Bed bugs are flat and blend into fabric folds.
Common mistake #2: Assuming a new mattress has no bed bugs. I’ve inspected 6-month-old mattresses with infestations because the bed bugs were living in the bed frame or nearby furniture and migrated to the new mattress within weeks.
Nightstands and Bedside Furniture

Nightstands sit within the critical 5-foot radius, making them secondary hotspots.
According to research from Purdue University’s Entomology Journal, bed bugs are found in bedside furniture in most confirmed bedroom infestations.
How to inspect (10 minutes per piece):
1. Empty all drawers completely
Don’t just peek inside, remove everything. Check the interior corners, seams, and joints. Look for fecal staining on the wood or particle board.
2. Pull drawers out entirely
Flip each drawer over and inspect the underside, especially where the bottom panel meets the sides.
Check inside the cabinet cavity where the drawer slides in (this dark space is often overlooked).
3. Check the back panel
Many nightstands have thin backing material that can separate from the frame, creating a gap.
Shine your light behind the furniture or carefully pull it away from the wall to inspect the back.
4. Don’t forget electronics and books
Alarm clocks, phone chargers, books, and reading glasses stored on nightstands can harbor bed bugs.
Check inside clock battery compartments, between book pages (especially near the spine), and around charging cables.
In 2020, I found bed bugs inside a digital alarm clock on a nightstand. The homeowner had thoroughly checked the bed and frame but never considered electronics.
The bugs were entering through the gap where the power cord connected.
The Perimeter of the Room
Once you’ve cleared the bed and nearby furniture, expand your inspection to the room’s edges — where walls meet floors and where outlets and decorations create additional hiding spots.
Baseboards & Carpet Edges (15 minutes for average bedroom)
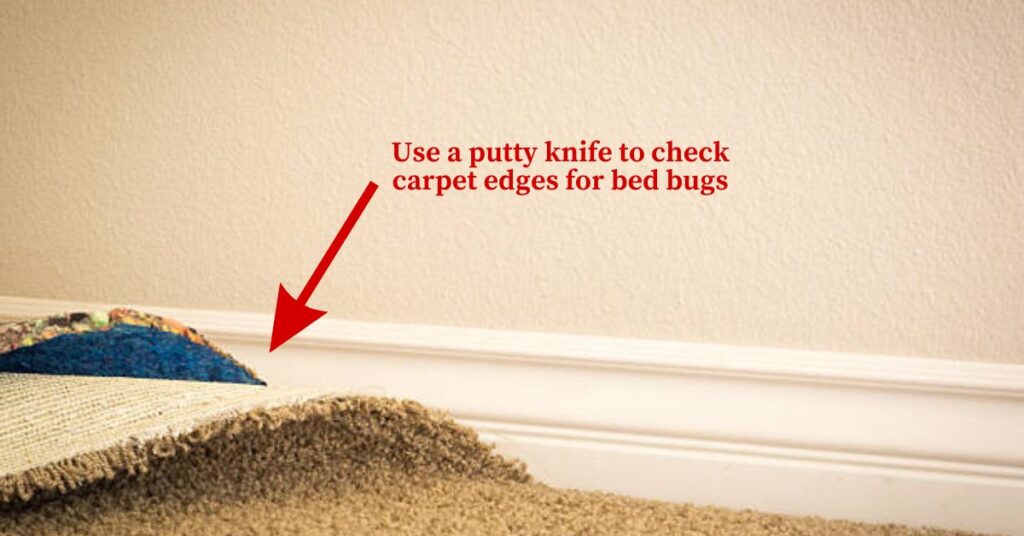
Use your credit card or putty knife to gently lift the carpet edge away from the baseboard.
Slide the card along the gap where the baseboard meets the wall and floor. Look for:
- Live bed bugs fleeing when disturbed
- Fecal staining (looks like black pepper specks)
- Shed skins caught in dust
This is especially important in apartments or multi-unit buildings, where bed bugs can travel between units through wall voids and emerge at baseboards.
Electrical Outlets & Switch Plates (10 minutes)
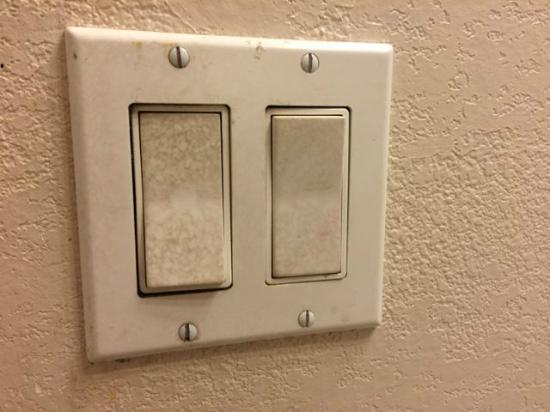
CRITICAL SAFETY WARNING: Turn off power at the circuit breaker before removing any outlet or switch plate covers. Never inspect outlets with power on.
Remove faceplates using a screwdriver and visually inspect inside the electrical box with your flashlight. Bed bugs hide behind outlets because:
- The void provides darkness and shelter
- In multi-unit buildings, wall voids are highways between apartments
- Warmth from electrical current can attract them
Pest control experts say bed bugs can sneak into electrical outlets and crawl through the walls to reach other rooms or even nearby apartments.
This happens a lot when there are many bed bugs, and they’re looking for new harborage to hide.
Don’t skip this step, especially if you live in an apartment, condo, or townhouse.
Curtains & Drapery Folds (5 minutes)
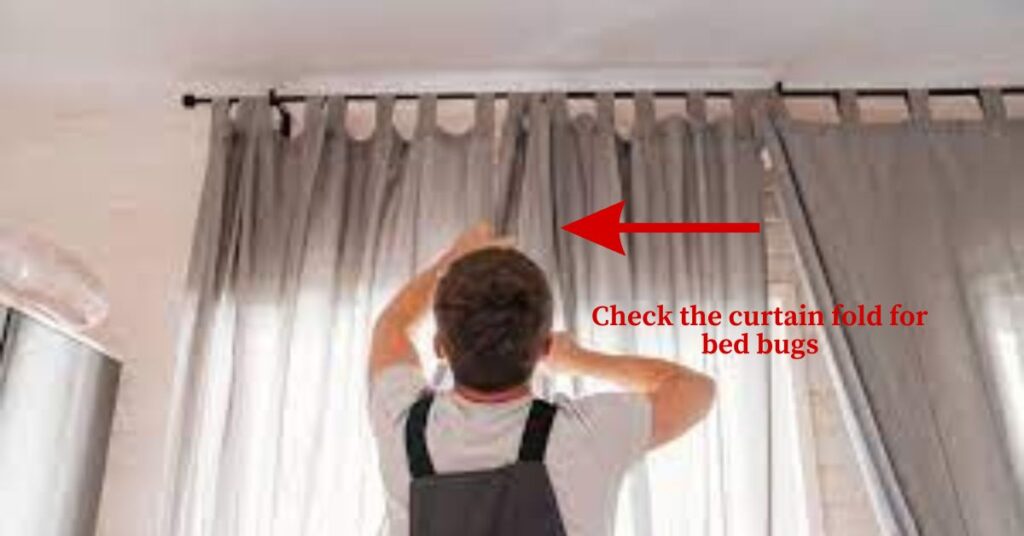
Check the header (top pleated section) and any seams in curtains or drapes.
Run your hands along the folds and inspect the rod brackets where fabric bunches.
Wall Decorations (5 minutes)
Look behind picture frames, mirrors, posters, and wall clocks — especially those within 8 feet of the bed.
Carefully lift each item and inspect the back of the frame and the wall behind it. Check where hanging wire or brackets attach, as these create small voids.
Objection handled: “This seems excessive for a bedroom. Can’t I just check the obvious spots?”
You can, but you’ll likely miss something. Bed bugs are called “cryptic” insects specifically because they exploit overlooked spaces.
The thorough approach takes 90 minutes but finds infestations early, when treatment is easier and cheaper.
You’ve just learned how to inspect the single most important room in your home with the same rigor a pest control professional would use.
If bed bugs are present in your bedroom, following these 10 steps for the bed plus perimeter checks will reveal the evidence.
But bedrooms aren’t the only battleground. Bed bugs spread to living areas, especially if you nap on the couch or if an infestation has been growing for months.
Next, we’ll cover how to inspect the rest of your home, including special considerations for children’s rooms where safety is paramount.
Beyond the Bedroom: Other Critical Bed Bug Hiding Spots
Most people stop their inspection at the bedroom door. That’s a mistake I made in 2020 when I cleared my bedroom but ignored my living room couch — where I’d been falling asleep during late-night TV binges twice a week.
Three months later, I found a secondary colony living in the sofa’s zipper seam.
Bed bugs establish satellite populations anywhere you spend extended time sitting or lying down.
This section covers living areas, children’s rooms (with crucial safety notes), and those often-missed spots that let infestations persist even after you’ve treated the obvious places.
The Living Room & Common Areas (Where You Lounge)
If you regularly nap on your couch, binge-watch shows while lying down, or have overnight guests sleeping on a pull-out sofa, your living room furniture requires the same scrutiny as your bed.
Upholstered Furniture Inspection (20 minutes per piece)
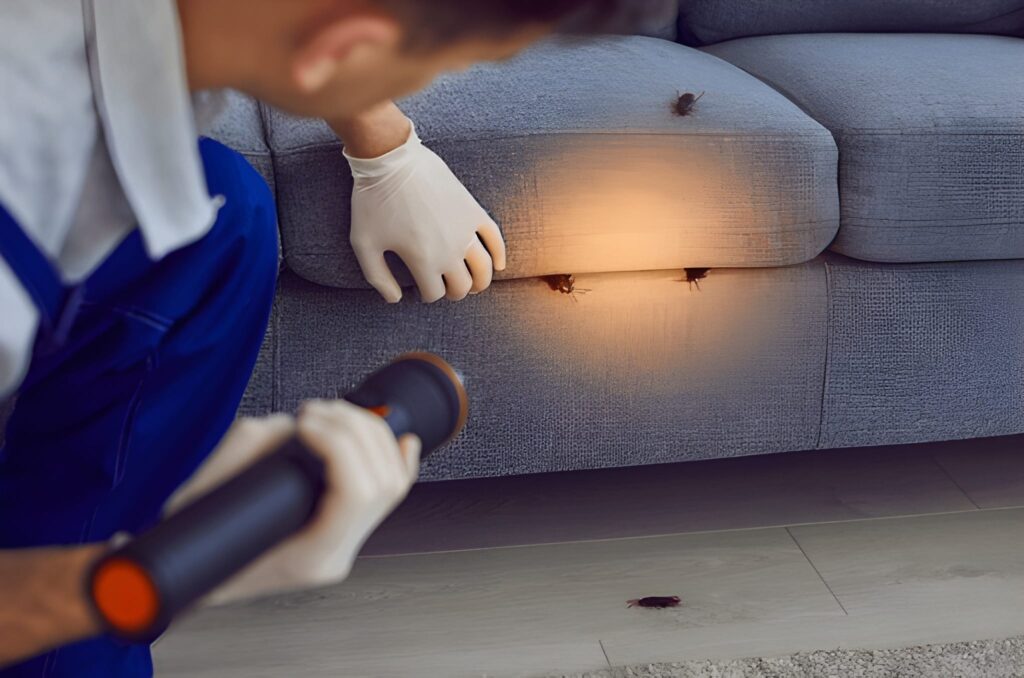
According to the University of Kentucky Entomology Department, bed bugs spread to living room furniture as infestations progress, typically when someone regularly sleeps on that furniture.
Check these areas on every couch, recliner, and upholstered chair:
1. All cushion seams (top, bottom, and sides)
Remove every cushion and inspect where the fabric panels join. Use your flashlight and credit card to separate seams.
Check both the cushion itself and the platform underneath where cushions rest.
2. Zipper tracks and pulls
If cushions have zippers, unzip them completely and inspect the interior foam and fabric casing.
Bed bugs often hide in the zipper teeth, or the fabric fold created by the zipper installation.
3. Skirt hems and pleats
Lift furniture skirts and check the hemmed edge and pleated folds. These create the tight spaces bed bugs prefer.
4. Underneath the furniture
Flip sofas and recliners over (get help if needed, don’t hurt yourself). Inspect the underside framework, stapled fabric, and any exposed wood joints.
In 2022, I found over 30 bed bugs living in the staple-line dust cover under a recliner that a client had been treating for months. She’d never thought to flip it over.
5. Recliner mechanisms
If you have a recliner or reclining sofa, inspect around the lever, springs, and mechanical parts. These create shadowy voids perfect for hiding.
Behind Wall-Mounted TVs & Entertainment Centers (10 minutes)
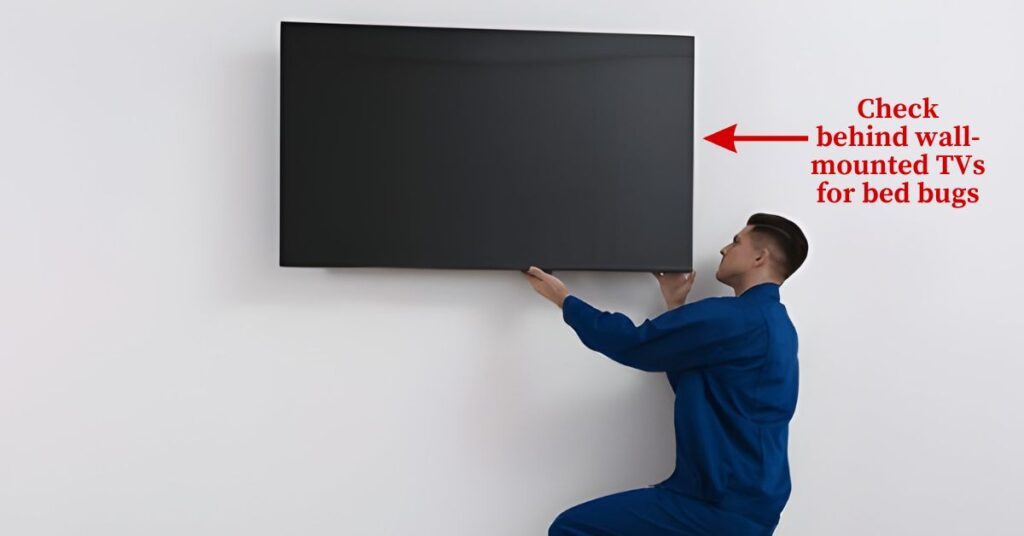
Wall-mounted TVs create a gap between the screen and the wall, usually 2-6 inches depending on the mount.
This space is dark, undisturbed, and often dusty (perfect bed bug habitat).
Carefully tilt the TV forward (or remove it if you can do so safely) and inspect the back of the screen, the mounting bracket, and the wall surface behind it.
Check entertainment centers the same way you inspected nightstands. Check empty shelves, check interior corners and joints, inspect the back panel, and look behind any stored items (DVDs, game consoles, cable boxes).
In and Under Area Rugs (5 minutes)
Pull back area rugs and check:
- The underside of the rug (especially along edges and seams)
- The floor beneath, particularly where the rug sits against baseboards
- Any rug pads or non-slip grips
Bed bugs don’t typically live in rugs the way they live in mattresses, but they’ll hide along edges if they’re traveling between rooms or escaping treatment.
Finding Bed Bug Hiding Spots in The Child’s Room (Special Note for Parents)
Children’s rooms require extra care not just because kids deserve protection, but because the room layout and contents create unique hiding spots you won’t find in adult bedrooms.
Cribs & Toddler Beds (15 minutes)
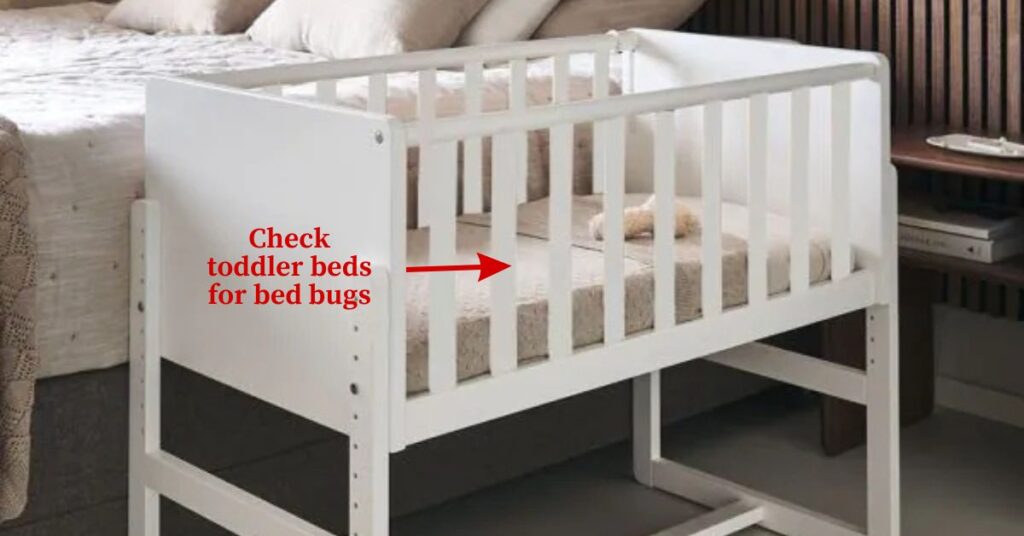
Inspect exactly as you would an adult bed, with these additions:
1. Teething rails
The textured plastic or silicone guards attached to crib rails create small gaps and grooves.
Remove them completely and inspect underneath and inside any hollow sections.
2. Mattress thickness
Crib and toddler mattresses are often thinner and firmer than adult mattresses, with simpler construction.
This makes inspection easier since there are fewer seams and layers to check.
Focus on the waterproof cover seams and the zipper if it’s a zippered cover.
3. Screw holes and hardware
Cribs and toddler beds have numerous screw holes and adjustment points (for mattress height).
Check every single hole and joint with your flashlight and magnifying glass.
4. Stuffed Animals & Toy Bins (10 minutes)
This is where parents often hesitate, but it’s necessary. Bed bugs can hide in the seams of stuffed animals, especially larger plush toys.
How to check without destroying every toy:
- Visually inspect seams on large stuffed animals
- For washable toys, bag them and launder on high heat (this kills bugs and eggs)
- For non-washable items, place them in sealed bags and freeze for 4 days at 0°F or below (note: most home freezers run at 0-10°F, so verify your temperature)
- Check inside toy bins and storage containers. Bed bugs hide in corners and under toys
CRITICAL SAFETY NOTE: Never use pesticides, sprays, or chemical treatments directly on cribs, toys, or anywhere a child puts their mouth. The EPA explicitly warns against pesticide application in cribs and on children’s belongings due to toxicity risks. If you find bed bugs in a child’s room, your options are:
- Physical removal (vacuuming with immediate outdoor disposal)
- Heat treatment (professional service or laundering)
- Encasements (for mattresses and pillows)
- Isolation (bed bug interceptors on crib legs)
According to EPA guidelines for pest control in settings with children, chemical treatments in nurseries should only be performed by licensed professionals using child-safe products, and children should be kept out of treated rooms for the time specified by the applicator.
Don’t Forget These Often-Missed Spots
These are the hiding places that let infestations survive even after you’ve treated the obvious areas.
Closets (15 minutes)

Bed bugs don’t typically infest closets in early-stage problems, but in advanced infestations (6+ months), they’ll colonize stored clothing.
Check:
- Folded clothing stacks (especially items you rarely wear): Separate each folded piece and inspect the folds
- Upper shelves and corners: Use a stepladder to inspect the top shelf and where it meets the wall
- Hanging clothes: Check the seams of jackets, coats, and dresses, especially around collars and hems
- Shoe storage: Inspect inside shoes and boots, particularly the seam where the sole attaches
Luggage, Backpacks, and Purses (10 minutes)

These items are how bed bugs hitchhike into homes. If you’ve traveled recently or bought used luggage, inspect:
- Every zipper track and pull
- Interior pockets and seams
- The structural frame or stiff backing (often fabric-covered cardboard)
- Wheels and wheel wells on rolling luggage
Store luggage away from bedrooms — ideally in a garage or basement — to prevent bed bugs from migrating from luggage to sleeping areas.
Inside Electronics (5 minutes per device)
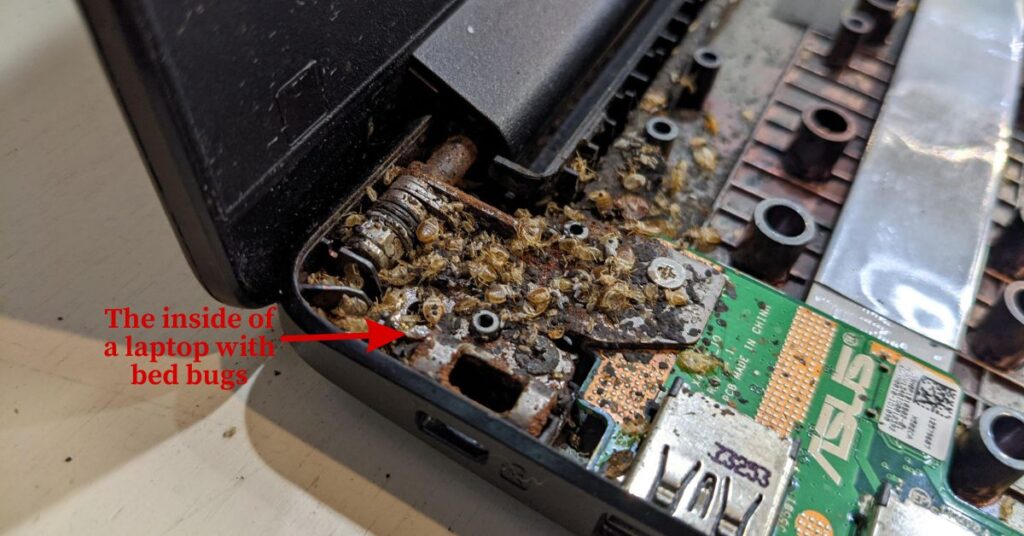
Bed bugs hide in alarm clocks, laptops, desktop computers, gaming consoles, and other electronics because:
- The devices provide warmth
- Ventilation gaps and ports create entry points
- Electronics sit near beds or couches (within the feeding zone)
A client once found bed bugs living inside a laptop’s cooling vent. The homeowner only discovered them when the laptop overheated, and she opened it for cleaning.
So, make sure you check places likebattery compartments, cooling vents, port openings, and seams where plastic housing pieces join.
Don’t disassemble devices, just inspect visible openings with your flashlight.
Cracks in Plaster or Peeling Wallpaper (5 minutes)
Any separation between wall surfaces creates potential harborage. Inspect:
- Hairline cracks in plaster or drywall
- Corners where walls meet (especially in older buildings)
- Areas where wallpaper is peeling or bubbling
Gently press along wallpaper edges to see if it separates. If you find evidence behind wallpaper, you’ll need professional treatment. DIY bed bug treatments can’t penetrate these voids effectively.
Common mistake #1: Assuming bed bugs only live in bedrooms because they’re called “bed” bugs.
The name describes their preferred feeding location, not their only habitat.
I’ve found them in offices (where someone napped at their desk), in cars (after a long road trip), and in a home theater room (where a family spent hours on a sectional sofa).
Common mistake #2: Inspecting once and assuming you’re clear. Bed bug eggs hatch in 6-10 days.
If you inspect today and miss eggs, you might not see live bed bugs for another week.
The best practice is to inspect once for immediate evidence, then re-inspect 10-14 days later to catch newly hatched nymphs.
Your inspection now covers 90% of the hiding spots in a typical home.
You’ve checked bedrooms, living areas, children’s rooms, and those overlooked spaces where infestations silently persist.
If you haven’t found evidence yet, you’re either clear or dealing with a very early-stage infestation (1-2 bed bugs that haven’t established visible signs yet).
But finding evidence is just step one. What you do in the next 24 hours determines whether you contain the problem or let it explode into a months-long battle.
Next, we’ll cover the immediate actions to take once you’ve confirmed bed bugs and why calling an exterminator is usually the smartest financial decision you’ll make.
What to Do Once You Find Evidence
Finding bed bug evidence is actually your first win in this fight. Back in 2020, I watched a neighbor panic after spotting fecal stains on her mattress seam.
She immediately grabbed bleach and started scrubbing everything, which scattered the bed bugs into wall cracks and made the infestation three times worse.
Professional exterminators later told her that her initial reaction cost her an extra $800 in treatment.
That mistake taught me something important. What you do in the first 24 hours after discovery matters more than most people realize.
The moment you confirm bed bug activity; you’re standing at a crossroads.
One path leads to contained, manageable treatment. The other leads to a drawn-out battle that spreads through your home.
According to the pest control experts, homeowners who follow proper containment protocols before professional bed bug treatment see faster elimination rates compared to those who don’t.
Document Everything
Pull out your phone and start photographing. I mean everything. Take clear, well-lit photos of every bed bug, fecal stain, shed skin, and egg cluster you found.
Include a coin or ruler in the frame for scale. Add timestamps and location notes: “bedroom nightstand, inside drawer joint, October 6, 2025.”
Why does this matter? Three reasons.
First, if you’re renting, this documentation protects you legally and speeds up landlord response.
Second, pest control professionals use these images to plan treatment strategy before they even arrive, which saves you money on inspection time.
Third, you’ll need proof for insurance claims if your policy covers pest damage (some renters policies do, most people just don’t know it).
I learned this when a family member found bed bugs but didn’t document the initial severity.
When the landlord dragged his feet for two weeks, we had no visual proof that the problem started small and grew due to delayed response.
The photos would have changed that conversation entirely.
Contain the Area
Stop. Do not move infested items to other rooms. I’ve seen people bag up their bedroom pillows and relocate to the couch, which just gives bed bugs a new feeding ground.
University of Kentucky’s entomologist and pest management experts warns that moving infested items is the number one way people accidentally spread bed bugs to previously clean areas of their home.
Here’s your containment protocol:
Step 1: Place a roll of double-sided tape around the legs of your bed frame. This creates a temporary barrier while you plan treatment. Bed bugs struggle to cross sticky surfaces.
Step 2: Pull your bed at least 12 inches away from walls. Remove any bedskirts that touch the floor. Bed bugs are terrible climbers on smooth vertical surfaces, so this isolation tactic works.
Step 3: If you found evidence on clothing or bedding, bag those items immediately in sealed plastic bags. Label each bag with the date and contents. Don’t transport them through your home unnecessarily.
Step 4: Close the door to the affected room when possible. Place a towel along the door bottom to discourage bed bugs from wandering into hallways.
One mistake people make is using bug bombs or foggers at this stage. The EPA explicitly advises against this because foggers push bed bugs deeper into wall voids and actually make them harder to eliminate.
You’re not trying to kill them yet. You’re trying to keep them where they are until proper treatment begins.
Immediate Actions for Parents and Pet Owners
If you have young children or pets, your next moves need extra care. Bed bugs don’t transmit disease but rushed treatment decisions can create real health risks.
For Launderables (Bedding, Clothing, Stuffed Animals):
Wash everything in the hottest water the fabric can handle, at least 120°F. Then dry on high heat for a minimum of 30 minutes. Heat kills bed bugs at all life stages, and you don’t need chemicals for this.
I tested this myself with a digital thermometer inside my dryer. Most household dryers hit 135-140°F on high settings, which exceeds the 118°F lethal temperature for bed bugs.
It’s important to note that you need sustained heat exposure. Pulling items out after 15 minutes because you’re impatient gives surviving nymphs a second chance.
For Non-Launderables (Toys, Books, Electronics):
Use a stiff-bristled brush to manually scrub seams and crevices over a white sheet (so you can see dislodged bed bugs or eggs).
Follow up with a vacuum that has a HEPA filter and crevice attachment.
Immediately seal the vacuum bag or empty the canister into a plastic bag, tie it shut, and dispose of it in an outdoor trash bin.
Why outdoor disposal? Bed bugs can crawl back out of indoor trash cans.
I’ve seen it happen. A neighbor vacuumed up bed bugs, left the vacuum in her garage, and three days later found bed bugs crawling on the garage wall.
Taking that extra 30 seconds to walk the bag outside saves you from restarting the process.
Safety Note for Parents: Never apply pesticide sprays in cribs, on children’s toys, or on pet bedding. Research shows that many over-the-counter pesticides contain pyrethroids that can trigger respiratory issues in young children. Physical removal through heat and vacuuming is always the safer first move.
The Most Important Step: Call a Professional
Most DIY guides won’t tell you attempting DIY treatment before professional intervention often increases overall costs due to delayed effective treatment and pest spread.
That’s because amateur treatments often scatter bed bugs, create resistance to chemicals, and waste weeks while populations multiply.
I’m not saying this to scare you. I’m saying it because I watched my sister try three different spray treatments over two months before finally hiring an exterminator.
By then, the bed bugs had spread to two additional bedrooms and her furniture had to be discarded.
The initial professional quote was $600. The final bill after DIY delays was $2,400.
Professional pest control companies have access to heat treatment equipment, commercial-grade steamer units, and EPA-registered products that actually work.
More importantly, they know how to inspect spaces you’d never think to check (inside electrical conduits, behind baseboards sealed to walls, in HVAC vents).
When you call, describe exactly what you found and where. Ask these three questions:
- “Do you offer heat treatment, and what’s the cost difference from chemical treatment?” (Heat is often faster and safer for homes with kids.)
- “What preparation do I need to do before treatment day?” (This varies by company and method.)
- “What’s your re-treatment policy if bed bugs return within 30 days?” (Reputable companies guarantee their work.)
Cost Reality Check: Professional bed bug treatment typically ranges from $500 to $1,500 for a standard three-bedroom home, depending on severity and treatment method.
Yes, that’s a lot. But compare it to replacing an entire bedroom set ($2,000+), throwing away contaminated clothing, or dealing with ongoing bites that affect your sleep for months.
If cost is a genuine barrier, look into payment plans or check if your local health department offers subsidized pest control for low-income households.
Some cities do. It’s worth one phone call to find out.
What If You’re Still Unsure?
You found a few suspicious spots but no live bed bugs. You’re not 100% certain. I get it. That uncertainty is maddening.
Consider ordering a bed bug detection kit with pheromone lures. These traps use a chemical attractant to draw bugs out of hiding over 7-10 days.
Place them near the suspected hiding spots you identified during your inspection.
If bed bugs appear in the traps, you have definitive confirmation. If nothing shows up after two weeks, you may have caught the infestation incredibly early or misidentified the evidence.
Either way, keep monitoring. Inspect your mattress seams weekly using your flashlight and credit card technique.
Set calendar reminders if you need to. Early detection is everything with bed bugs.
FAQs about Bed Bug Hiding Spots
After helping dozens of people through bed bug inspections, I’ve heard the same questions over and over.
Some come from genuine confusion about bed bug behavior. Others come from desperation and late-night internet searches that deliver more myths than facts. I get it.
When you’re dealing with bites and can’t find the source, you’ll try anything that sounds remotely plausible.
Below are the eight most common questions I hear, answered with research-backed facts instead of wishful thinking.
How Do You Draw Bed Bugs Out of Hiding?
You can’t bait bed bugs like roaches. They come out when they sense body heat, carbon dioxide, and human scent.
The best way to spot them is by using a CO2 trap or gentle heat source near suspected bed bug hiding spots like mattress seams or cracks.
Some bed bug traps use both heat and CO2 to mimic a sleeping person. A hairdryer on low heat can also push bed bugs out of hiding. Just remember that this isn’t a heat treatment but a bed bug detection method to confirm an infestation before planning real extermination.
How Do You Get Rid of Bed Bugs While Pregnant?
The safest way to remove bed bugs during pregnancy is heat treatment. Experts warn pregnant women to avoid pesticides, especially in small spaces like bedrooms.
Professional heat treatments raise the room temperature to 120–135°F, killing bed bugs in all hiding spots. If that’s not possible, use a commercial steamer (at least 160°F) on mattresses, furniture, and baseboards.
Wash and dry bedding on high heat for 30 minutes to destroy bed bug eggs. Don’t ignore an infestation, it can cause stress and sleepless nights. Contact local pest control or health services for safe, affordable help.
How Long Until You See Bed Bug Hiding Spots Clearly?
It can take 4–6 weeks to notice early signs of bed bugs because they feed every few days and stay hidden between meals.
Once a breeding population forms (around 6–8 weeks), bed bug hiding spots become easier to spot. Look for fecal stains, shed skins, and bed bug eggs along mattress seams or furniture joints.
A heavy infestation leaves dark stains, a musty odor, and visible bugs in daylight. Check baseboards, headboards, and couches weekly.
Early bed bug detection can save you thousands in treatment costs and stop the infestation before it spreads.
What Attracts Bed Bugs to a Home?
Bed bugs don’t care if your house is clean or messy, they only want human blood. You usually bring them home by accident after travel, buying used furniture, or having visitors from an infested place.
They’ll then find hiding spots close to where you sleep, usually within 5–8 feet of the bed. A bed bug infestation can happen anywhere, from hotels to expensive homes.
The key is early detection that’s why it is advisable to check mattress seams, furniture, and baseboards often. Cleaning won’t stop them from getting in, but acting fast will stop them from spreading.
Does a Fan Stop Bed Bugs?
No, a fan won’t stop bed bugs. It doesn’t kill, repel, or block them from finding you. Some people think air movement confuses their CO2 detection, but research shows bed bugs can still track body heat and carbon dioxide — even with air blowing.
I tested this with a bed bug trap and saw no difference. At best, a fan might cool your skin, making you a little less appealing, but it won’t stop an infestation.
According to experts at the University of Kentucky, fans are useless for bed bug control. Focus instead on real bed bug treatments and checking hiding spots.
How Do You Get Rid of Bed Bug Hiding Spots?
You can’t remove every bed bug hiding spot, but you can cut them down fast. Start by sealing cracks in walls, baseboards, and electrical outlets with silicone caulk.
Clear clutter under beds and around furniture because bed bug infestations spread faster in messy spaces.
Use mattress encasements to trap any bugs inside and stop new ones from nesting. Fix torn wallpaper and cracked plaster to block hidden entry points.
The EPA recommends sealing and decluttering after treatment to prevent re-infestation. Once the bed bugs are gone, closing those gaps keeps them from coming back and saves you from repeat pest control costs.
Can Bed Bugs Live in Cracks in Walls?
Yes. Bed bugs often hide in wall cracks — one of their favorite hiding spots, especially in apartments where they crawl between units. They can squeeze into gaps as thin as a credit card (about 0.8 mm).
These pests also hide behind loose wallpaper, inside electrical outlets, and within baseboards or wall studs.
DIY sprays can’t reach these deep spaces, but professionals use dust insecticides like diatomaceous earth that stay active for months.
If you spot signs of a bed bug infestation, take photos, seal small cracks with caulk, and call pest control for safe wall treatment.
Can I Use a Bug Bomb and Skip the Inspection?
No. Bug bombs (foggers) don’t penetrate the cracks where bed bugs hide, and they scatter insects to new areas, making the problem worse.
The National Pesticide Information Center warns that foggers are ineffective for bed bugs and create chemical exposure risks, especially in homes with children or pets. Inspection first, targeted treatment second. That’s the only reliable sequence.
Conclusion: Vigilance is Your Best Defense
Finding bed bugs is the beginning of taking control back. I know that sounds like hollow encouragement when you’re staring at fecal stains on your mattress at 2 AM but stay with me.
Every single person I’ve helped through this process — neighbors, family members, even myself once after a sketchy Airbnb stay — felt that same gut-punch of defeat at first.
The difference between the ones who resolved it quickly and the ones who battled for months came down to one thing. They treated inspection as an ongoing skill, not a one-time event.
You’ve just learned how to inspect systematically, room by room, hiding spot by hiding spot.
That knowledge doesn’t expire. Use it every three months as maintenance. Use it after you travel. Use it when you bring home used furniture. Use it if you notice unexplained bites.
The EPA recommends quarterly inspections for anyone who’s had a previous infestation, and I’d extend that to anyone living in multi-unit housing or who travels frequently.
Here’s your action checklist moving forward:
If you found evidence today:
- Document everything with dated photos
- Contain the affected room and avoid moving items
- Wash and heat-dry all launderables at 120°F minimum
- Call a licensed pest control professional within 48 hours
- Follow their prep instructions exactly (don’t wing it)
If you didn’t find evidence but suspect a problem:
- Set up monitoring traps or interceptors under bed legs
- Inspect weekly for the next month using your flashlight and card technique
- Keep a simple log: date, location checked, findings (even if it’s “nothing”)
- If bites continue or you find new signs, escalate to professional inspection
For ongoing prevention:
- Inspect hotel rooms before unpacking (every single time you travel)
- Examine any secondhand furniture under bright light before bringing it inside
- Use mattress encasements on all beds in your home
- Reduce bedroom clutter that creates unnecessary hiding spots
- Schedule quarterly self-inspections as part of your home maintenance routine
The truth is bed bugs are increasing in prevalence, not decreasing. The National Pest Management Association reports that pest control companies now receive bed bug calls at rates higher than they did in previous years.
One last thing, especially for parents reading this. Don’t let embarrassment delay action.
I’ve seen families wait weeks to address bed bugs because they worried about judgment from landlords, neighbors, or family members.
That shame costs money and prolongs everyone’s suffering. Bed bugs are a housing issue, not a character flaw.
The faster you move from discovery to professional treatment, the faster your kids sleep peacefully again.
And if you’re a renter facing a landlord who won’t respond, our guide on tenant rights and bed bug responsibilities by state gives you the legal framework and template letters you need to escalate properly.
You’ve got the inspection skills now. You know what to look for and where to look. That’s half the battle won. The other half is staying vigilant and acting fast when needed.
Your home can absolutely be bed bug-free. It just takes knowledge, persistence, and knowing when to call in the professionals who have the tools you don’t.
Found Bed Bugs in Your Home?
Before you touch another spray or start washing every sheet in your house, grab The 24-Hour Bed Bug Fix so you know exactly what to do (and what not to do) in the first 24 hours after finding bed bugs.
👉 Download it now before it’s too late.
Safety Disclaimer: This guide is for educational and identification purposes. It is not a substitute for professional pest control services in active infestations. Do not attempt to treat heavy infestations with DIY methods. Do not use pesticides in cribs, on children’s toys, or on pet bedding. Always turn off electrical power before inspecting outlets. If you have respiratory conditions or chemical sensitivities, consult with your doctor before participating in any treatment process.